|
|
|
| | |
| | | | | | |
| | |
|
| Nelze vytvořit spojení s databází!!!Počet videní stránky: 0. |
 
| |
|
Edea > Montáž kolieskových korčúl | Montage of a roller blade | Assembly Of A Roller Frame on EDEA BOOTS
This operation should be performed by specialized technicians only. However, we suggest simple directions for a correct assembly. During the manufacturing the heel is fixed to the boot internally with 4 screws. You should never remove any of them, as you may compromise your safety.
Necessary TOOLS:
- Mounting screws
- Screw driver
- Drill bit mm 2,5
- Drill bit mm 4,2
- Reamer
- Pen
- Mounting stand
- Metal file
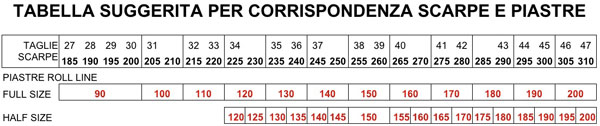
CHOOSE THE CORRECT FRAME SIZE
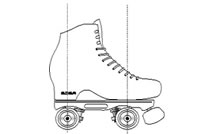
To obtain the best contact and manoeuvrability the frame supporting points have to match the foot power points. The rear axle should be positioned at the middle of the heel, while the front axle should be at the metatarsus. As an indication, you may refer to the following size comparison chart.
STEPS:
- If you wish to activate the boot ventilation it is easier doing it before assembling the frame. To do this, drill the marked spots on the heel with a mm 2,5 bit and go deep about mm 2.
- Unlace the boot and remove the innersole
- Identify and pen mark two spots inside the boot, between the two screws holding the heel.
- By eye, identify the corresponding spots on the bottom of the heel and mark them. This way you have a reference direction when you drill through from the bottom.
- Con una penna a inchiostro cancellabile segna, all'esterno di ogni parte del tacco (vedendolo dall'alto)un punto in corrispondenza dei fori creati all'interno. Questa operazione serve per darti la direzione da seguire quando si forera il tacco dall'esterno.
- Place the boot on the mounting stand. a) place the frame onto the sole. b) laterally centre the frame on the sole heel and position it 1 mm inwards. c) in front, centre the frame on the boot centre (not the sole centre).
- When the frame is correctly aligned, mark the sole through the plate holes.
- Remove temporarily the frame and start drilling the sole heel. While drilling, the keep a direction slightly inwards and try to reach the spots as per 3).
- Place the frame onto the sole and insert a long screw through the drilled hole. This helps checking if the first hole is correct and all the marks still match the plate holes.
- Remove the frame and take out the long screw and drill down the second hole on the heel in the same way as 8).
- Place the frame onto the sole and insert both long screws on the heel and check that the frame is correctly positioned. If not, you have to drill the heel again to the correct centred position.
- Now you centre the front of the frame to the front sole.
- Holding the frame onto the sole carefully drill down through one front plate hole.
- Insert a screw through this hole.
- Still holding the frame onto the sole carefully drill down through the opposite plate hole.
- Repeat the operation as 13-15) for the remaining two plate holes.
- Same operations as 2-16) for the second boot.
- Before putting the screws you need to countersink internally all the holes, so the screw heads are fully recessed and create not pressure on the foot.
- Now you assemble the frame to the boot:
- Insert the long screws through the boot heel and through the frame. Put the washers and the bolt, do not tighten yet.
- Insert the Power Wedge between the frame and the sole. Then insert the short screws through the frame. Put the washers and the bolt, do not tighten yet..
- For all the Roll Line flat frames you should use the Edea Power Wedge between the sole and the frame, keeping the hollow towards the frame. The hollow is designed to take the break screw
- Assemble all the screws and tighten all the bolts.
- Tape the frame screw areas, cut all exceeding screw threads and file accurately.
- Complete the roller set by assembling crossings, cushions, wheels, insoles and laces.
| 
|
|
|